Showing posts with label video tutorial. Show all posts

Tuesday, June 4, 2013

Tutorial Tuesday: Using Actions In Photoshop

TutorialTuesday
 Hey guys! Nicole here from Urban Wings Art and I am thrilled to share with you some of my photography, design, and editing tips, tricks and SSSHHHHH secrets! Some of my tutorials are going to be step by step and posted right here on the blog. Others are going to be video tutorials!....but (and here is the caveat)....you MUST forgive me if you hear a lot of "ummmms".....awkward pauses or... if I generally make a complete goof of myself! I tend to do that A LOT! Ask my family! But if you promise to forgive me for keeping it real, then I am happy to bring you more video tuts in the future!!!! And be sure to share the tutorials, videos and tips with your facebook friends, your pinterest pals....you get the idea! We love the LOVE that you can give us and it helps us know what you would like to see more of!!! So without further ado....I present a tutorial on how to use actions in Photoshop! There is a step by step guide below the video if you would like to see the information in print!


 Start by loading your action in Photoshop. There are several ways to do this. Here is the method that I use:
  • Open Photoshop and choose Windows> Actions
  • Your Action menu will open up. Click on the top right hand corner, on the icon that looks like an arrow pointing down and 4 small bars. This will open a new menu. On this menu you will have the option Load Actions...
  • Choose Load Actions... and select your action from where you saved it on your computer or hard drive. Click Load.
Your action is now installed! Open a photo in Photoshop and with your action menu open. Click on the small blue arrow by the action folder that you have downloaded. This will open up all actions in the set. For all Urban Wings Art Actions there are 3 actions included in the set. For this tutorial I am using Spring Lux Action Set. Select the action you are wanting to run. And hit the Play button at the bottom of the action menu. Your action will run automatically! And the great thing about these actions is that they are in folders on top of your photo, so you can change the intensity after you have run them! For more products and actions check out the Creative Pixel store! More tutorials coming next Tuesday! Have an awesome week!!!!

Wednesday, May 1, 2013

Tuesday, April 2, 2013

Photography Tutorial Tuesday | Newsprint Matte Photo Effect


Newsprint Black and White Photo Effect | By Nicole Young of Urban Wings Art

Matte Coloring and Matte Black and Whites are incredibly popular right now and really give photos a dramatic edge.  I will show you a quick tutorial on creating an easy "newsprint" black and white matte photo using two adjustments in Photoshop.
Step 1:  Duplicate your photo.


Step 2:  Choose Layer>New Adjustment Layer>Hue/Saturation.  Click OK on the first window.  Move your Saturation slider all the way to -100 and close the adjustment box.


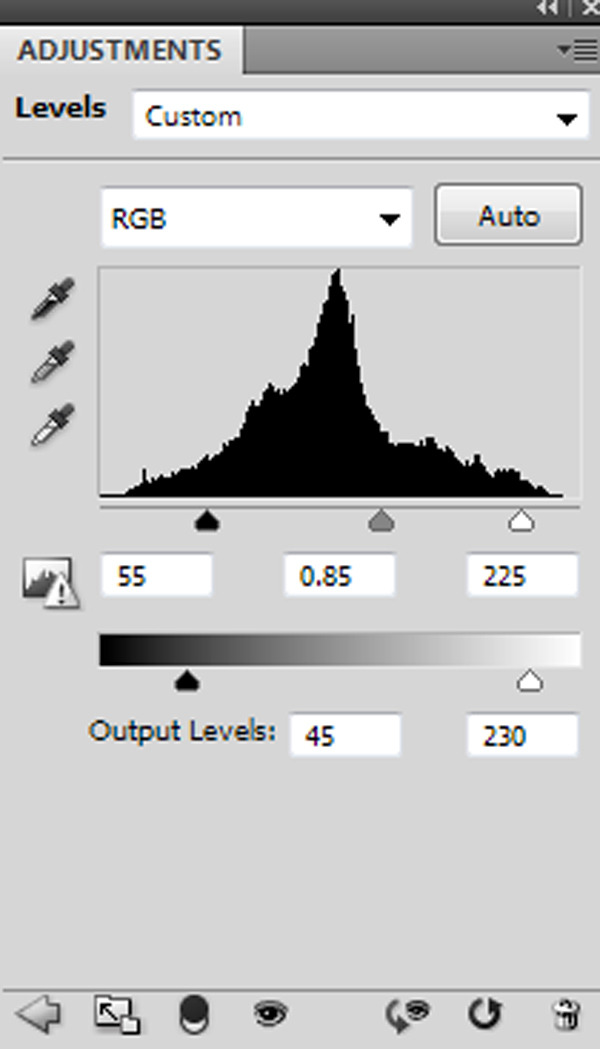
Step 3:  Choose Layer>New Adjustment Layer> Levels.  Stay on the RGB dropdown and going from left to right insert 55, 0.85, and 225.  For output levels enter 45 and 230. And close adjustment window. (See picture below).


And VOILA!  Done!  A moody black and white newsprint style matte photo!


Copyright 2013Urban Wings Art

Tuesday, February 19, 2013

Tutorial: Warm It Up | Photoshop Techniques and Tricks

In this Photoshop tutorial, we will be sharing how to take a photo and giving it a natural warm color tone.  This is great for photos taken on cloudy days or in the winter that seem a little drab or blue-casted.  Adding a touch of warmth can really change the feel of the entire photo!

STEP 1
Below is the image that needs a bit of warmth added.   We are going to start by adding a new adjustment layer.   There are many ways of doing this, we are going to go to our menu bar.  Choose Layer>New Adjustment Layer> Hue Saturation.  When asked to name your layer just hit OK.  Your new adjustment layer menu will be open.  We are going to move the Saturation slider to approximately +10-15. I chose +13 for this photo.


STEP 2
We are now going to add another new adjustment layer.  Go to your menu bar.  Layers> New Adjustment Layer> Curves.  We are going to click on the RGB curve and pull the center part of the line "up" just a tiny bit, we are also going to pull the bottom end of our curve just slightly to the left.  This will brighten up our midtones and darken up our blacks.  (see the curve in the image below)
STEP 3
Another adjustment layer (do you see a pattern here :)).  Go to your menu bar, choose Layers> New Adjustment Layer> Curves.  ***you could technically use the same adjustment layer as Step 2, however keep them separate allows for more editing or adjustments if you are not pleased with your results. ***  In the drop down menu that defaults to RGB, switch it to Blue.  We are now going to adjust our "blue" curve.  Pull your curve down just a little bit below the top of the curve line.  Once you have pulled your curve line down a bit, add another curve point (by simply clicking on the curve) and pulling up toward the center line.  (see image below and try to replicate the shape of the curve.)
STEP 4
Next we are going to add a fill layer.  From your menu choose Layers>New Fill Layer> Solid Color.  I choose the color #E8d38b.  Hit OK.
STEP 5
We are going to change our fill layer to Soft Light on the layers palette and to an opacity of around 15-20%.
That's IT!  Save your new warmed up image and you are ready to roll!!!

Here is a sample of the before and after images:
And here is a sample after a quick Eye Pop edit and Texture applied.  We use textures that we create ourselves and are sold at Digital Scrapbook Place, Inc.  The texture applied here is from The Photographer's Toolbox - Natural Spice Overlay Set.


Hope you enjoyed the tutorial!  Be sure to come LIKE us on Facebook  and see more of our work and be the first to see our newest tutorials and specials!!!