Tuesday, August 13, 2013

Tutorial Tuesday | A Quick Visual Guide to Blend Modes


Hey guys!  Nicole here from Urban Wings!  I created a Quick Guide to Blend Modes for you guys to check out!  Feel free to share it on, but please link to our blog!   
Okay, to be perfectly honest after YEARS of using Photoshop, I STILL don't know or understand what every blend mode does.  I VISUALLY understand, but when you get into the technical points of it (dividing channels, blah blah blah...) you lose me quickly!
I am a try-it-and-if-I-like-it-I-use-it girl!  And so I have put together a visual guide and a quick explanation of a couple of my FAVORITE go to blend modes!  NO technical knowledge necessary.  This is totally in layman's terms.  

Normal----self explanatory.  This mode is just what it says.  NOTHING has been done to your photo.  It is in it's pure state.  Totally normal.
Screen----okay, so there is a lot of technical mumbo-gumbo to explain why it does what it does.  But I do love Screen mode.  It essentially makes everything brighter and whiter. MY FAVORITE USE: Lightening up a Scrapbooking background.  Just make a copy of your scrapbooking background and set the blend mode to screen.  VOILA instant lighter background!
 Multiply---the opposite of screen.  So technically, maybe this ISN'T the case.  But if I want something dark.  I multiply it!  MY FAVORITE USE: Darkening up scrapbook papers. 

Soft Light--- LOVE LOVE LOVE me some Soft Light.  It is PERFECT for Overlays and adding textures to backgrounds.  It is subtle and gives a pop of the texture!  TRY it out!!!  Another cool use:  add a 50% gray layer above any picture and change the blend mode to soft light!  It DISAPPEARS!  Paint on some white....and everything lightens up.  Paint on some black...and everything darkens.  This is GREAT for photo editing and adding shadows or contouring without making the changes on your photo layer!!!

Overlay---More intense than soft light, but similar concept!  Try this one with textures and overlays too! 

Hope you enjoyed our tutorial!  If you want to know all the technical information about Blend Modes.  Adobe provides it on their site HERE
Come LIKE us on Facebook and share what you have created and check out more of our tutorials, freebies, tips and photography!


Friday, August 9, 2013

FREE MINI GRAPHICS PACK on our Facebook Page

Hey guys!  Nicole here, and I wanted to share a FREE graphics pack with you!  It is a mini set (11 pieces) for you to enjoy!  If you want to use it for commercial use projects, please contact me at nicole@urbanwingsart.com

CLICK HERE TO GO TO OUR FACEBOOK PAGE to download the FREEBIE


Fabulous FAIR Friday!


If you live within photoshooting distance from us, you know the Iowa State Fair is going on right now. What a great place to spend some time (and $$) this weekend!  

No time (or $$) for the Iowa State Fair -- or you live far away from us?  Deb here suggesting four more 'fairs' to consider this weekend.  Pull up TCM on your cable station (yes, the old-movie station), butter some popcorn and enjoy!

My Fair Lady (1964)
This isn't a fair movie -- it's a GREAT movie.  Audrey Hepburn at her BEST in this classic, intelligent, witty musical!  And the costumes & hats are super-photo-worthy!


This is a movie about the Iowa State Fair so it has to make the list.
Trivia buffs:  What was the name of the big boar in the movie?
Trivia Answer:  Blueboy -- and he was love-sick.     


Jean Simmons looking for her missing brother at the 1889 Paris Exhibition.  This movie is on my to-watch list and it gets high marks from others that love a good mystery. 


A FAVORITE of mine!  I've watched it at least 20 times -- mostly with the grandkids (often with Grandpa too).  Judy Garland sings her way through the seasons.  Literally, the seasons:  The movie is four little vignettes representing summer, fall (our favorite), winter, spring.  
The climax (sort of):  The 1904 St Louis World's Fair.


Happy Fairing!

Wednesday, August 7, 2013

Fresh & Fun Wednesday | Wedding Bells and Seniors and FREE Printables

Wow, I can't believe it has been a week since my family was having some great fun at Twin Lakes Family Camp!  Seriously, if you are ANYWERE in the Iowa area, this is a summer MUST!  They run the most amazing, fun-filled, activity-filled, drain-you-of-energy-but-lift-up-your-spirit camp that I have ever been to.  And now that are final summer fun is coming to close, I am realizing just how quickly we are approaching SCHOOL!  Seriously, where did the summer go???

So I am recovering from our busy week and doing LOTS...okay, LOTS is an understatement....TONS AND TONS of photo editing!  We had a GREAT response to our School Memories Mini Session, so far!  And we are planning a couple of dates this fall to add more mini sessions for anyone still interested!!!  If you ARE interested, email me and we can talk about what dates work out best for YOU!  $40 per family (no matter how many kiddos! and this includes prints!!!!)  Contact me at nicole@urbanwingsart.com


We have also been busy with some Wedding and Senior Photography!  Can't give you a sneak peek of the Wedding just yet (preview to come!) But here is a sneak peek from our Senior session this week!


We also had an amazing session with a little one who was turning TWO!  I LOVE LOVE LOVE that age!!!  And he was the cutest spunkiest little guy, but had the most gorgeous hauntingly beautiful look when he was being serious!!!


And just in case you hadn't grabbed it yet.  We created a FREE PRINTABLE for you to Print and Frame for personal use only!  Grab the high resolution version from our facebook page!!!

Have an AWESOME WEEK GUYS!!!  Give us a call to schedule your upcoming photo session or get a free consultation for your photo editing or graphic design project!!!  515-554-8907

Tuesday, August 6, 2013

Tutorial Tuesday | Walden Effect in Photoshop


Hey guys!  Nicole here and I am back with a fun Photoshop tutorial for you!  Have you caught on to my love of Instagram yet?  Well I have a new Instagram effect in Photoshop for you to try!  This tutorial assumes you have at least a basic knowledge of Photoshop, layers, and adjustments.  Are you ready to get started?

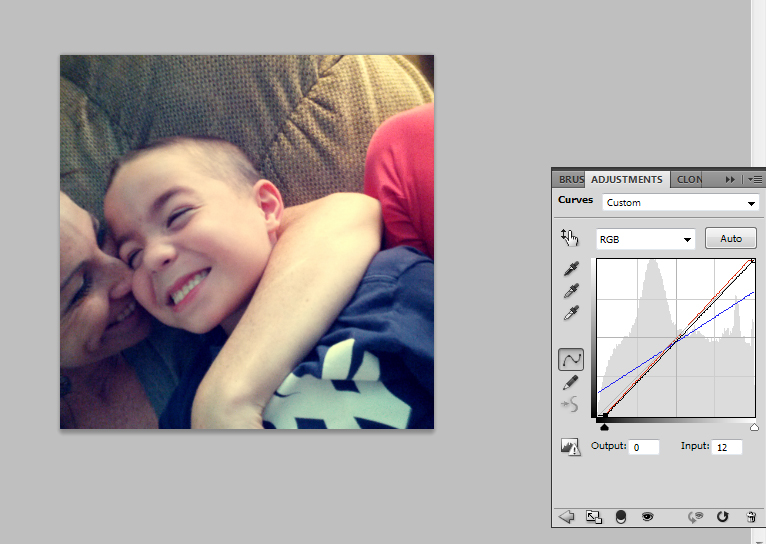
1. Start with your open photo in Photoshop.  Here is my BEFORE photo.  This is a pic from my cell phone, so nothing high quality about it, but a fun photo of my oldest son and me goofing around.  Nothing like some pink yoga pants to make you feel gorgeous!!!


2.  We are going to add a Curves adjustment layer.  I will take you step by step through the settings on your first Curves adjustment layer.
Starting with the RGB Curve. (first drop down)
Change your bottom corner input to 12.  Output will remain 0.  No change to your upper right input and output (they should be set at 255, 255)


Click on your RED curve (from the dropdown menu)
Your bottom left corner should be: Output 0, Input 10
and your upper right should be:  Output  255, Input 247

Click on the BLUE curve (from the dropdown menu)
Lower left:  Output 38, Input 0
Upper right: Output 203, Input 255


3.  Next we are going to add a LEVELS Adjustment layer.
We are going to change our Center slider under the histogram to 1.17
Change the Right slider to 233.
We are also going to change our output level to 57 and 255.


4.  Now we are going to add another CURVES layer.  This time we will only be adjusting the RGB curve.
You are going to adjust both the bottom left point, as well as adding a new curve point. (Add a point to your curve by clicking anywhere on your curve line and then typing in your input and output levels into the corresponding boxes below.
Lower left point: Output 0, Input 41
Add point on curve, type in: Output 124, Input 125


5.  Lastly, we are going to add a small gradient to the edges of our photo.  We will do this by adding a GRADIENT FILL layer.  Click on the Gradient bar in the Gradient Fill Menu.  This will open the Gradient Editor.  We will choose the option of black and white gradient.  The black point will be at the left of your gradient and the white to the right.  We want the opacity on the black side to be set to 100% and the opacity on the white (right) side to be set to 0% opacity.
We will move the right opacity slider (on the TOP of the gradient bar) to a location of 38, and make sure the opacity is 0%.
Click OK to get out of the Gradient Editor.
Next you are going to have your Gradient Fill menu open.  Change your Style to RADIAL.  Angle of 123-124 degrees.   And click REVERSE and ALIGN WITH LAYER.  Click OK.
Next change your LAYER STYLE to SOFT LIGHT.


AND VOILA!  You have an awesome Walden Effect on your Photo!!!  Check out the before and after photos one more time!!!  

If you LOVED this tutorial, please SHARE it, PIN it, TWEET it, or email us to let us know you loved it!!!  We love hearing from you!!!  Be sure to check out all our tutorials and news on FACEBOOK!!!!


Sunday, August 4, 2013

Hot Styles Sunday | Navy Love

Hey guys!  Nicole here from Urban Wings Art!!!  I love scouring through the new arrivals at all the clothing stores (I am SORTA addicted to clothing and LOVE seeing all the pretty stuff that comes out!)

And again and again and again, know what I noticed?  Especially for girls?  The fall trend looks to be NAVY!!!  I love navy, it can be combined with just about anything.  Neutral colors---brown, gray, white.  Or you can really pop it with some hot pink, teal or lime!

Here are some of my favorite pieces I have seen!!!  All the products and links to the stores are on our pinterest page HERE
I LOVE it!!! The sequins and dots really add to the awesomeness!!!


Saturday, August 3, 2013

Fabulous Friday...ahem...Saturday | Camp Craziness

Hey everyone!   So this past week we have been playing catch up with photography and design, photographing school photos, photographing a wedding, photographing a senior, attending a wedding, AND going to family camp out of town.  It has been a crazy whirlwind of a week and both my mom (Deb) and I are EXHAUSTED!!!!  But this week has been oh so fun!!!

Here are FIVE Fabulous photos of (mostly) my boys from our time at Twin Lakes Family Camp!!!! (more pics of the girls and all the fun to come soon!)


Hope you guys all had an awesome week!!!!