


Hey guys! Nicole here
and I am back with a fun Photoshop tutorial for you! Have you caught on to my love of Instagram
yet? Well I have a new Instagram effect
in Photoshop for you to try! This
tutorial assumes you have at least a basic knowledge of Photoshop, layers, and
adjustments. Are you ready to get
started?
1. Start with your open photo in Photoshop. Here is my BEFORE photo. This is a pic from my cell phone, so nothing
high quality about it, but a fun photo of my oldest son and me goofing
around. Nothing like some pink yoga
pants to make you feel gorgeous!!!

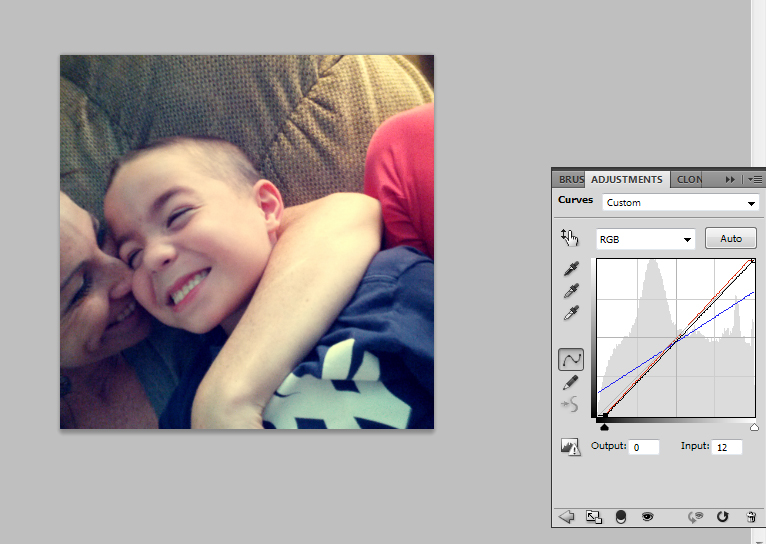
2. We are going to
add a Curves adjustment layer. I will
take you step by step through the settings on your first Curves adjustment
layer.
Starting with the RGB Curve. (first drop down)
Change your bottom corner input to 12. Output will remain 0. No change to your upper right input and
output (they should be set at 255, 255)

Click on your RED curve (from the dropdown menu)
Your bottom left corner should be: Output 0, Input 10
and your upper right should be: Output
255, Input 247

Click on the BLUE curve (from the dropdown menu)
Lower left: Output
38, Input 0
Upper right: Output 203, Input 255


3. Next we are going
to add a LEVELS Adjustment layer.
We are going to change our Center slider under the histogram
to 1.17
Change the Right slider to 233.
We are also going to change our output level to 57 and 255.

4. Now we are going
to add another CURVES layer. This time
we will only be adjusting the RGB curve.
You are going to adjust both the bottom left point, as well
as adding a new curve point. (Add a point to your curve by clicking anywhere on
your curve line and then typing in your input and output levels into the
corresponding boxes below.
Lower left point: Output 0, Input 41
Add point on curve, type in: Output 124, Input 125


5. Lastly, we are going
to add a small gradient to the edges of our photo. We will do this by adding a GRADIENT FILL
layer. Click on the Gradient bar in the
Gradient Fill Menu. This will open the
Gradient Editor. We will choose the
option of black and white gradient. The
black point will be at the left of your gradient and the white to the
right. We want the opacity on the black
side to be set to 100% and the opacity on the white (right) side to be set to
0% opacity.
We will move the right opacity slider (on the TOP of the
gradient bar) to a location of 38, and make sure the opacity is 0%.
Click OK to get out of the Gradient Editor.
Next you are going to have your Gradient Fill menu
open. Change your Style to RADIAL. Angle of 123-124 degrees. And click REVERSE and ALIGN WITH LAYER. Click OK.
Next change your LAYER STYLE to SOFT LIGHT.


AND VOILA! You have
an awesome Walden Effect on your Photo!!!
Check out the before and after photos one more time!!!


If you LOVED this tutorial, please SHARE it, PIN it, TWEET
it, or email us to let us know you loved it!!!
We love hearing from you!!! Be
sure to check out all our tutorials and news on FACEBOOK!!!!
No comments:
Post a Comment