Sunday, July 28, 2013

SEE YOU FRIDAY!!!!


https://fbcdn-profile-a.akamaihd.net/hprofile-ak-ash4/c26.26.321.321/s160x160/1005206_10152051331328496_100281317_n.jpg

Hey guys!  We are taking a quick break this week from Tutorial Tuesday and Fresh and Fun Wednesday to play some catch up and work on some SUPER EXCITING new things for Urban Wings!!!  Don't you wish there were a few more hours each day???

In the meantime, check out our FACEBOOK PAGE, we will still be staying updated there!

Hope you guys have an AWESOME week!!! 

Hot Styles Sunday | J. Crew Style


Hey everyone!!!  Nicole here from Urban Wings Art!  Okay, so there is a background story to this Hot Styles post!  In the last few weeks I have had two little kiddos show up in the same ADORABLE dress for a photo shoot!!!!  So I asked one of the moms where this fashionable little get-up came from...J. Crew....
Why do I forget about J. Crew for kids clothes?  Yes, it is a bit pricey, but some of their stuff....okay ALL of their stuff is SO SO SO stinking adorable!  So at least take some style tips from the pros at J. Crew who really know how to dress kids!!!
Some of my favorite pieces straight from J. Crew....

***love the layered baseball t-shirt and button up****


***striped hoodies??? yes, please!!!****
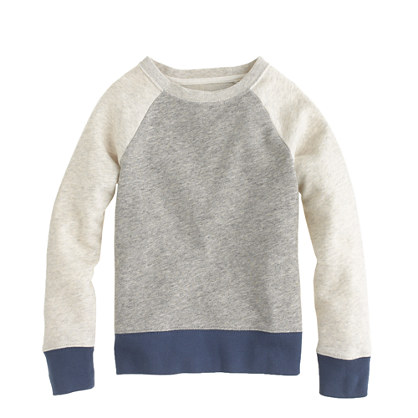
Boys' colorblock sweatshirt
***color block ROCKS!!!!****
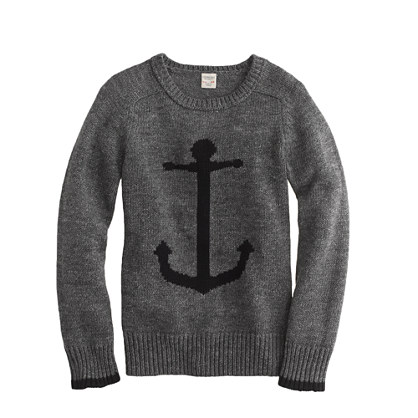
Boys' cotton anchor sweater
****oh, be still my heart!  I LOVE me some anchors!!!****

***do you see those layers????  that AMAZING mix of patterns???  WAY TO GO J. CREW!!!  You sold me....I now need to take out a second mortgage to afford all these awesome outfits for my kids for our photo shoots!!!***

****LEGGINGS!!!!  Yes yes yes!!!!***

Check out all the great styles that are in right now at J. Crew!  And no, I am NOT getting paid to give them props, they just have AMAZING outfits!!!

Friday, July 26, 2013

Fabulous Friday | This Week in Instagram Photos


Yes, you are about to see grainy, un-edited, imperfect, Instagram photos on a photography blog....and I LOVE them!  Nicole here, and I wanted to share with you my favorite Instagram photos from the last few weeks that I took!  Yes, they are my kiddos, so I am smitten, but I love grabbing quick snapshots of our daily life!  Follow me on Instagram and I will follow you back!!!

Follow me on Instagram: http://instagram.com/nicoleyoung_urbanwingsart #urbanwingsart

Thursday, July 25, 2013

FREE PRINTABLE 8x10 WALL ART

Hey guys!  Nicole here!  I just put up a new FREEBIE for you guys on our Facebook page!  It is available for EVERYONE, you don't have to be a client, scrapbooker or photographer!  It is a printable 8x10 wall art of Psalm 119:105....Be sure to come LIKE us on Facebook, DOWNLOAD your freebie and SHARE us with your friends!!!

(hi-res version available for FREE download on our facebook page)

SALE TODAY ONLY!!!!!

HEY GUYS!!!  Merry Christmas in July!!!!  The Creative Pixel is having an BUY ONE, GET ONE FREE sale TODAY ONLY!!!!

Be sure to go check out ALL of Urban Wings Art design products available at the Creative Pixel store today!!!  And fill up your cart, because this sale will be over at midnight!!!!   

PRODUCTS BY URBAN WINGS ART


Wednesday, July 24, 2013

Fresh & Fun Wednesday | Wedding Bells and Christmas in July

Hey guys!!!  Okay, seriously, have you BEEN outside?  If you are local, you will know that we have FINALLY had some relief from the horrendously hot days and have had some beautiful weather!!!  Yesterday as I was running I saw SO many bikers on Ragbrai!  Did any of you bike it?   It has been awesome weather for it!!!

So here at Urban Wings we have been CA-RA-ZAY busy!!! Seriously, it SO awesome to be busy, no complaints here!!!  And I love all the variety we have had lately!  One year old cake smashes, weddings to shoot, senior pics coming up this next week, school photos, new website changes, and more website changes to come, collages, photo books, marketing material, and MORE!

PHOTOGRAPHY FRESH & FUN

These last few weeks we have had the privilege of celebrating a first birthday with a little one, with a one year old cake smash session!   HAPPY BIRTHDAY HUDSON!!!!

We have also been getting new equipment (woo hoo!), shooting family photos and getting ready for a wedding shoot this weekend!
We also did a small site redesign to update some outdated pics and information!!!  I hope you guys will check it out!!!  I wanted to note that we have made the decision to offer digital packages now!!!  AWESOME!!!  So now if you want your ENTIRE photosession on disk, that is available!


I will say, you will probably notice quite a bit more site updates and changes in the next few months!  We are going to do some major construction in there soon and we are SOOOOO excited about it!!!  More updates on that soon!!!

DESIGN FRESH & FUN

Jingle bells, jingle bells.....YES, it is THAT time of year....NO, not ACTUAL Christmas!  But CHRISTMAS IN JULY!!!  And boy do the girls over at the Creative Pixel have some great sales and challenges ready for you!!!  Come join in on all the fun there!!!  Here are some Christmas packs we have popping into the Creative Pixel store!!!


So give us a call and schedule your photosessions for fall!  We are open for taking appointments!!!  And if you are looking for a custom photo project, we would love to talk to you more about that!  We have been working on custom wall canvases and photo books for our own photography clients AND for some that live to far away to have a photo session with us, but wanted their own photos put in an awesome collage for canvas or photo book!  We can help you with that!!!  We would love to hear from you!!!

Come say HI on Facebook!  Hope you all are having an awesome Wednesday!!!!


Tuesday, July 23, 2013

Tutorial Tuesday | Text Formatting in Photoshop


Hey guys!!!  Nicole here from Urban Wings Art!  I am excited this week to share with you a basic Photoshop tutorial that will help you achieve a nice formatted look to your text!  Let's get started!


Photoshop Text Formatting Tutorial

1.  Start with an open document in Photoshop.  You are welcome to use a plain background, a photo, or whatever document you choose to add text to.  This kind of formatting is great for cards, greetings, scrapbook journaling, and published documents. I am going to start with a photo of my littlest peanut and add some journaling to the side.  But I want to keep my journaling contained on only one part of the photo, so we will format our text to have constraints.

2.   Click on your text tool in Photoshop.  The text tool icon can be found in your tools bar and looks like a "T". 

Once you have your text tool selected, you are going to choose the place on your document that you want to add your text.  Usually if you were going to start typing you would left click your mouse somewhere on your open document and start typing.  This will cause your text to continue in a straight line.  However if you click and drag (hold down your left mouse key while you drag, or keep your pen tool on your tablet if you are using a Wacom).   You will be able to create a "box"  in the area you want to type in.  Drag until you have covered the area that you would like to type in and release your mouse button.


3.  Start typing!  Right now my text is set to center alignment, but for the moment, that part won't matter.  I just type out my journaling until it is complete and then we will work on formatting until we like the look of it.


4.  We are now going to format our text.  Go to your menu bar, click on Windows and choose Paragraph.  This will open your paragraph editing menu.


5.  Select all your text that you have journaled.  And now start experimenting with the different paragraph formatting options.  My font and font size are already set to what I want them to be.  So I want to spread my text out so that it is straight along both the left and right side.  So I will click on the last paragraph alignment option. 


At this point you are done!  Experiment with different font sizes, fonts, and alignments to get the journaling look you want!!!
Hope you enjoyed this tutorial!  Be sure to come LIKE us on Facebook for more tutorials, freebies, news, and peeks of our works!!!


Sunday, July 21, 2013

Hot Styles Sunday | Preppy Hipster-- Boy Edition


Hey guys!!!  Nicole here with some HOT STYLES to inspire you this week!  So, one of the biggest trends I have been seeing around his hipster!  I LOVE it!  I love the geek-y but totally cute vibe that the bow-ties, suspenders, vests, and cardigans give off!  So this week, embrace your inner geek and check out some cute hipster styles I found on Etsy!!!  These are some great piece to work into your photo session or to dress your kids in!  Lots of great texture and colors that will photograph AMAZINGLY!!!  All the links to the products shown are on our pinterest board 

Come join us on FACEBOOK for more fun and inspiration!!!!

Friday, July 19, 2013

FABULOUS FRIDAY | LA LA LA


Hi guys!  Nicole here with another awesome edition of FABULOUS FRIDAY!!!   

So I was wracking my brain about what fabulousness I should bring you this Friday.  And since I LOVE to listen to music while I work I figured I would bring you my FIVE Fabulous Friday songs....
So if you don't already know this about me, I LOVE worship songs.  Seriously LOVE.  I don't listen to blood-pumping-beat-kicking music on my long runs....NOPE....I seriously listen to partially instrumental.  Slow and serene worship music.  I love running through trails and listening to songs about my Creator at the same time!  It's an awesome and uplifting experience!


So here are the TOP FIVE that have popped on to my Pandora radio station while I have been running and working!!!


5. 10,000 Reasons by Matt Redman


4. How He Loves by David Crowder Band


3. Times by Tenth Avenue North

2. Your Great Name by Natalie Grant

1. Beautiful Scandalous Night by Leigh Nash and Bebo Norman


I would love to hear what you guys listen to when you work out or work or just in the car!!!  Hope you are having a FABULOUS FRIDAY!!!!

Wednesday, July 17, 2013

Fresh & Fun Wednesday | Marathon, Photos, & Designs


Hey guys!!!  Nicole here!  So I did it.  I forked over a ridiculous amount of money and I am officially signed up for the IMT Des Moines Marathon.  The. Whole. Thing. 26.2 miles.  YIKES!  This is my FIRST marathon ever!  I have done 1/2 marathons before, but this is like the big one.  The one thing on my non-existent bucket list....that would be on said-bucket list if I had one.  Something I have wanted to do for a LONG time...but never have.  Sooooo keep me motivated until October and share with me your marathon stories, encouragement or if you are running this marathon or ANY marathon or races (long or shorter) this year tell me about it!!!  We can keep each other motivated!!!!
And speaking of motivated....(did you like that goofy segway)...... we have been UBER motivated this week with photography and design projects....here is a recap of our last few projects and what's been going on at Urban Wings Art!!!

PHOTOGRAPHY FRESH & FUN:

Cake smash birthday photoshoots.  Family photoshoots.  Kiddo photoshoots.  Lots of pictures being taking recently.  But even more than that we have had LOTS of requests for our Photography Books and Photo Canvases.  If you haven't seen these or heard about them yet, they are GOR-ORGEOUS!!!  We are working on lots of designs for our photography clients for coffee table books that we are SO excited for them to see and display!  Plus we have designs coming along for some out of state clients who sent us THEIR photos for a wall canvas!  WE DO THAT TOO!!!  We love helping you create ART for your homes!  If you have a photography/art project, please inquire with us and we can give you a personalized quote!!!


DESIGN FRESH & FUN:
Some great new products are hitting the Creative Pixel store this week!!!  Here are a few to whet your appetite!


And here are some recent amazing layouts that were recently created by the Creative Pixel members with some of our products:


And we have also been busy doing some graphic design projects!  Some cute invites lately!  Here is a little peek at one of our recent designs for a bridal shower!


Hope you guys enjoyed seeing what the Urban Wings Girls have been up to!!!  Please let us know if you have any questions at all or would like to chit chat about your design and photography needs!!!  Have an awesome day!!!!  COME LIKE US ON FACEBOOK FORMORE DESIGN AND PHOTOGRAPHY FUN!

Tuesday, July 16, 2013

Tutorial Tuesday | Instagram Toaster Photo Effect in Photoshop


Nicole here.  And yes, my love of Instagram is rearing its ugly head again!  Are you as addicted as me?  It's so fun to capture those everyday life moments and then add a cool photo effect!  Don't you agree?  So I thought it would be awesome to replicate some of those photo effects in Photoshop, so I can add some awesomeness to my big-daddy camera photos!  One of my all-time fav effects in Instagram is Toaster.  It is so warm and just makes me all happy inside!  So here is my attempt at recreating the effect in photoshop!!!  Ready to follow along?
First here is the before and after on my phone
BEFORE Instagram Toaster Effect:


AFTER the Toaster Effect is add on Instagram:

Instagram Toaster Effect in Photoshop

1. Open a your photo in a new window.  Open> and browse until you find the photo you want to work with.  Click OPEN.

2.  The first layer we are going to add to our photo is a CURVES layer.  I will go through each of the individual settings for Curves.
Starting on your RGB Curve.  Pull the center of your curve up to approximately an output of 132 and an input of 121.

Next switch your Curves drop down to Red.   Starting at the bottom.  You are going to move your bottom left corner up to an output of 33 and an input of 0.
Your center point of your line is going to be moved up to an output of 133 and an input of 107.
And your top right corner of  your Red Curve is going to be pulled to the left with an output of 255 and an input of 226.

Next switch to your GREEN Curve dropdown.
The only point we are changing on our Green Curve is the bottom left corner.  We are going to change the output to 5 and the input remains 0.

Next we will switch to our BLUE Curve.  Starting with our bottom left corner point we are going to change the output to 66 and the input to 0.  Make a point in the middle of the line and change the output to 143 and the input to 156.  Next at the top right hand corner change the output to 221 and the input remains 255.

2.  We are now going to add our second next layer.  We will add a GRADIENT Layer to our photo. 
Start by adding a Gradient Layer.  Click on the color scale at the top of your Gradient Menu Bar.  Your first color for your gradient (on the left hand side) is a dark blue/purple.  I used the color #190a51.


On the right hand side of the gradient I chose a yellow-y orange color.  I used color #ffc436

Next we need to make sure that the opacity for the entire Gradient is 100%.  So click on the arrows at the TOP of the gradient color slide to check the opacity.

Click on one of the bottom color arrows (the blue or yellow ones at the end of your color slider) and a small diamond will appear in the center below of the gradient slider.  We are going to move that diamond to the left to about a location of 40.  This will move how far the yellow gradient goes out to the edges.

Click OK to save the colors and locations of the colors of the gradient.  You should still see your Gradient Menu open.  Change the Style to RADIAL.   Change the angle to 128.  And click REVERSE in the boxes.  Click OK.  You should be able to see your gradient right now and NOT your photo.

Next we are going to change our layer style to OVERLAY at 71% opacity.

4.  Now we are going to add one final layer.  Another CURVES layer.  This time we will only be working on the RGB Curve.  Starting with the bottom left corner change your output to 0 and your input to 18.  Make a point in the middle of your curve and change the settings to an output of 155 and an input of 118.

And that is IT!  You have Toaster-ized your photo!!!!  What do you think?  

"Toaster" Effect in Photoshop:

Feel free to adjust the settings until you have the perfect combo for your photo!!!  Let me know what you think!!!  And be sure to LIKE us onFACEBOOK to see more tutorials, more products & grab our current freebie!!!